·:*¨Etsy Shoppe¨*:·


Showing posts with label jewelry. Show all posts

Friday, July 2, 2010

DIY Lightbox - So Easy!

I was frustrated. Couldn't quite get the quality images I wanted- and typically on days I plan to take pictures, it would be sunny riiiiight up until I set up and got everything organized and ready to go. And then... Clouds. Or rain.

There were many times I fumed at the sky- cursing the clouds for souring my photographs and the artsy way I had planned on taking my pictures. I was very creative with my language too- but I'll be a lady and not repeat what words came out of my mouth.... *grin*

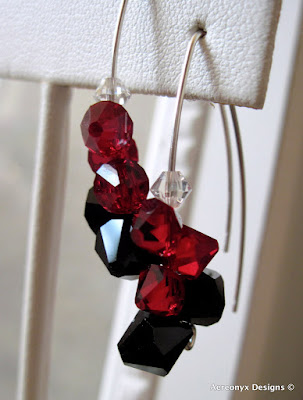
So, quick update- my back isn't any better. My hands shake because of the medications I'm on, and I haven't been motivated to make any jewelry because I'm tired all the time. Side effects of the meds, and it's really hard to create jewelry with shaking hands. However, the other night- I got mad. REAL mad. And I made some new pieces which will debut with a few glimpses at the end of this post. We're trying really hard to figure out what's wrong with my back and why the spasm won't let up- but we may be close to finding the answer. But back to the exciting topic at hand.

You honestly won't believe how easy this is. You probably already have all the items needed to make it already in your house/apartment!

A Light Box

Ingredients:

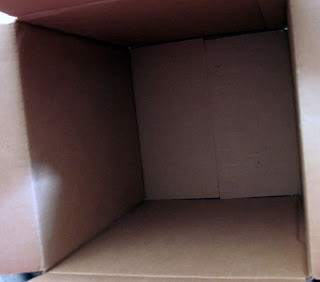
1 ) Cardboard Box. Yes, you read that right- any old box will do. You want it to be a decent size, so you can use some props if you so choose, and so that you can get your hands in there to position items. I'm sure you have one kicking around the house somewhere- right? A recent order delivered in the mail? Or recently moved and unpacked? Great! If not- check out the grocery store, or a bookstore- they always have cardboard boxes. The best part- they're free! (Unless you want a nice new one and pay for it. That's ok too. I like cheap though!!)

My Box:


2 ) Packing Tape. Yep, the clear stuff you use to seal those cardboard boxes. You'll probably have this hanging around too. If not, duct tape could work. I wouldn't recommend just regular old tape though. It's too thin width-wise, and it would most likely end up being harder to work with- honest!

3 ) Box Cutter. Yes, a sharp blade. We need to do some cutting here.

4 ) Ruler. You know, like a measuring tape. I have a metal edged one, so there wasn't any destruction of the wooden measuring device. You can substitute any straight metal object to use as a guiding edge when you cut.

5 ) Paper. I used regular old computer paper- three sheets. You can use tissue paper too- the idea is to diffuse the lights so that there are no harsh shadows. For inside the box, you can use a cut to size width piece of poster-board (any color you choose) that you can tack to the top, and length should come out to the box flaps or beyond. This allows for the paper to "curve" at the back without making an obvious seam- when you take your pictures, there's no visible backing in the box. It's like infinity. I used a white pillow case which has a lace trim so I had some visual interest in addition to just plain white fabric for photos. You can use whatever you like!

6 ) 3 lights. I use incandescent. However, I don't have them set up in a holder yet- so I used Mom's Ott Light instead- above the box.

7 ) Dad. This is optional for you. However, because of my medications and how they make me so out of it, I figured that it wasn't a smart idea for me to wield a sharp blade and operate it safely :P

8 ) A pen.

Alright- ready to get going?

First, you need to cut out the size of square you want. Since my box is on the smaller size (for now!) all I needed to do was take a piece of computer paper and lay it on one of the sides I wanted to cut. Using a ball point pen, about 1/4 of an inch in from each corner push the pen through the paper and into the cardboard. It should indent and create a punched hole square on that side of the box.


Using the ruler, or metal substitute piece, use the knife to cut out the square. Not too bad, right? Place this new cardboard square on the other two sides of the box, making sure it's centered, and use the point of the knife to make a cut on each of the corners so it will mark where you need to cut. Take the ruler, and cut out the squares.


Using small pieces of tape, secure the paper corners over the "windows" you've now created in the box. Now, tape the edges down to the box.
(Is it just me, or are you reminiscing about how when you were little, boxes used to be such fun play toys... Especially big ones that could be turned into a fort... LOL)

It's done.


Seriously!


And I cut the back flap of the box and used a folded pillowcase with lace edging for my background. You can use whatever you want- paper, colors, textures- anything goes!


That's all there is to a free lightbox! (Well, free for me... Not for you if you need any of these supplies- not counting the box of course!)

So... After Dad and I did this.... I went straight upstairs and rigged up my new toy. Mom's got an Ott Light in her craft room, so I figured- that's a natural white light... I'm going to try just using light on the top panel of the box. Lights, camera programmed the way I want it... Action!


Sweet Geranium Necklace


Seashell Earrings I made for my sister.


Baby Pink Lampworked Earrings with Silver "Dust"

As you can see- I got some really awesome shots! This was probably the easiest project done to give me the results I wanted to see with my jewelry! I'll still continue to use natural sunlight and props to get some visually interesting pictures, but I love how true the colors are with my free cardboard light box!

Wednesday, May 19, 2010

Disco Fever


I've been able, during my more lucid moments, to get crafty... This excites me to no end! I've managed to find some pretty glass beads- though not exactly what I was looking for, they'll do for now. I was able to get some pictures of them yesterday, but I haven't unloaded or edited them yet. I'm still very unmotivated- all due to the meds the doctors have me on.

I found some glass beads, albeit not the ones I was looking for that I so fell in love with- and they have large holes- as to fit Pandora/Troll/Biagi bracelets. But, I thought, I'll figure something out. I'll make it work. And... I think I did. You shall see evidence tomorrow of such. I managed to come up with a pink and gray necklace and earring set, and two rose glass necklace and earring sets with different colors- one has clear rondelles, the other has a pretty iridescent light green. Like I said... I can't wait to show you how they came out... But the thought of removing myself from underneath this warm nest I've huddled into is not ideal, and it ain't gonna happen!!! Why would I need to move? My camera batteries are in the other room, not in my camera!


I did, however, post a new pair of earrings I came up with the other day.
Let's just say... I got disco fever! These little balls just remind me of a disco ball- albeit they're rainbow, have cut portions to see the amber glass inside.... And are just plain fun!


If I could get up and do a little dance, I totally would!

Sunday, May 16, 2010

Glass


The Underwater Ocean Earrings- one more set available once I get more supplies!

I've decided over the past few days, I must start using glass in my jewelry.

Now, I admit it.... I've been sort of a snob. Nothing but the best. And to me, that's Swarovski. It glitters, it sparkles, it's delightful in so many different designs. There are so many different crystal styles, shapes and components to use- it's mind boggling. They're sexy, they're sweet, they're bold... Anything you want them to be- you can design it.

A lot of jewelry designers incorporate these crystals into their own designs- so often it's difficult to come up with designs that are completely original. I don't steal designs from other artists- but I do like to borrow concepts and incorporate them in to mine. And I hope that some people that come across my own designs do the same... Just don't steal please!

As much as the crystal sparkles and shines- I'm now discovering the beauty of glass. Namely, lampworked beads. I never, ever, ever dreamed that they could be so absolutely stunning! I mean- I'm used to going to (and I hate it) Wal Mart and remembering seeing the strands of "beads" they sell there. Cheap metal, cheap cut glass, just... Nothing you can really turn into quality jewelry. Michael's Crafts is similar- albeit a bit better quality- and I actually do find some fun beads in there from time to time. The problem still remains is that the beads aren't always uniform... And they still look cheap. But not *always*. Cheap jewelry drives me batty. It's great for a costume party or dress up with little girls- but the look I'm aiming for here is classy. Refined. Unique.

My inspiration as of recently has been due to Pandora bracelets. There are so many ladies that now have the bracelets- myself included- and the beads that go along with them. My favorites, of course, are the array of glass rounds that are floated on the bracelets. But- that's not quite my angle. I don't want to use wide beads- as stringing them on headpins will make them slide right off. My solution?

Fellow Etsians!

So many different beads... Whirls, swirls, rainbows and flowers. Iridescent colors, dichroic glass, stripes, patterns... The combination of different looks to be created are limitless!

Here are just a few of the beads I'm peeking at at the moment...

This beautiful bead below is from Red Side Designs shop. I love flowers encased in glass beads- it's such an understated simplicity that it's hard to resist. I'd turn this one in to a beautiful pendant on a necklace.


I love whirls and swirls. Blue is a favorite color of mine- I have blue eyes, and anything that sets them off I'm a fan of. Typically- if I wear blue toned jewelry- it does the trick! These beautiful borosilicate beads are made in BBGlassArt's shop.


And of course, I've gotta go fun and funky. I fell in LOVE with these unique beads! They remind me of an anemone- just not in the ocean! These would become a necklace/earring set. Perhaps even one as a charm on a bracelet- why limit imagination!? These are from Sock Monkey's shop!


Last, but certainly not least, a wonderful shop was suggested to me on my Facebook page by a fellow artist. The shop is Radiant Mind, and there are SO many beads there that I want to buy right up immediately...... I have to restrain myself! Look at this gorgeous set and the colors used... I can't wait to get started... And to show off some of my new works!


So there it is... I'm strictly supporting fellow Etsians for my lampwork glass beading needs!

Friday, March 12, 2010

I need to get better...

About this blogging thing!

Things have been so busy lately, I hardly know which direction is up or down.

Creativity has been put on hold temporarily, but I've made some newer pieces that I've posted in my shop. Usually it's the other way around- I do a sneak peek here, and then post them. I guess it's ok though... I could not be telling you at all!

First up, I'd like to share a Treasury I made which was inspired by the Moody Blues. I've had the song "Nights in White Satin" stuck in my head, and playing it over and over hasn't made me sick of the tune yet. So here's my picks for the Main Treasury...


Next up.
I've been dying to go see "Alice in Wonderland"... I'm a huge fan of Tim Burton, and any movie he's made I have to pick up. I was pretty steamed when my roommate and I got robbed back in September of 09- they made off with my copy of "The Corpse Bride" which is one of my all time favorites. I regress. I've been so anxious to see the new movie, I was inspired to make some new earrings.


Alice Through The Looking Glass


The Red Queen, of Hearts

I was aiming for whimsical, yet simple and understated.
But that would still make a statement! I've kept a pair of the "Alice" earrings for myself (because I love the blue so much) and I can't tell you how many compliments I've already received! They're very, very sparkly! They're similar to the earrings featured in the design of my Semele's Amethyst Earrings found in the "Changelings" post. Ever since I discovered the top drilled Swarovski Bicones, I've been in love!

Wednesday, February 10, 2010

Snowed In.... And a Peacock Treasury!

I love snow.
I love to make snowmen, get in snowball fights, dig tunnels, go sledding or skiing...
But this is getting ridiculous!

Considering VA-DOT hasn't really done a good job keeping the roadways clear, and the roads around where I am just about as good looking- well, suffice it to say I'm staying inside. Coming from New England, I think that anyone that is employed by the DOT in southern states has to be required to plow for at least two years in New England.

Why?
Some of the craziest weather happens up there. From ice storms, to blizzards, to dustings, quick melts, re-freezing, and all of the above- people need to know how to drive in this kind of awful weather, but also how to clear the roads properly.
Ahem... Liiiike, not scraping all the snow off the road so it's left a solid sheet of ice....
At least then, when the weather like this hits every once in a blue moon- the employees are prepared for action, and know how to clear it up quickly and efficiently. Oh- and use sand too, not just salt please! Sand = traction! And that's a marvelous thing!!

For instance- I don't think when you venture out, you should be driving on a sheet of ice:


Or that driving down the road should feel like you're skidding over a mogul field:


Or that the 4 lane road for you to take 2 lefts, one straight, and right turn is only ONE lane:


And it's probably a good idea to clear snow out of intersections!!!!!!!!!


Did I mention that this mess is left over from the Friday/Saturday/Sunday storm we had last weekend?!?!?! Yep... Roads still aren't cleared.... And I took it upon myself yesterday to "plow down" snow in our parking lot. No, there's no plow attached to my truck. But it kind of stinks when people take snow off their vehicles and pile it behind someone else's... Or the snow piles up in between "spaces". So in to 4wd Truckasaurus Rex went, and lots of backing up and pulling forward and packing down the snow so other people in smaller vehicles could get in. I know I didn't have to do it... But, nobody else would. I did a good deed!


As far as today- we got about another 15-18 inches of snow. On top of the nearly 3 feet from this past weekend, which has hardly melted. The roommate took a walk down and said that if I were to go venture into the snow where it's not drifted, it would most likely come up to my hips. I may have to check him on that later... Just to make sure. I'v seen plenty of people struggling to just get across our parking lot today... Rather amusing. Even my kitteh thought so:


Ok on to better and prettier news.
I happened to be in the right place, at the right time last night...
And I nabbed a Main Treasury that I've named "Peacock Dreams".


I've always been fascinated with the different tones of blues, greens, and sometimes pinks that you can find in a peacock's feather. So a little something to share with you! It brightened my day, considering all I've been looking at lately are shades of gray and white. And dirty brown.

Monday, February 8, 2010

Nabbed it....

My very first Treasury!

I've been featured in one, and now I've made one!

February 21st is my birthday. And I love my birthstone.

Amethyst.


I've always loved the purples my birthstone is associated with... But... Lately, I've been discovering other colors. Like Prasiolite- better known as Green Amethyst. Of course, you can't reisist the delicate tones of Pink or Lavender stones.

So there you have it- what do you think?!
Go ahead and click the picture to be taken to the listing, and leave a comment!!

Hello Anti-Valentine

Yes, yes. The truth is going to come out.
Here it goes... I'm not one of those girls that goes gaga over Valentine's Day.


Be My Anti-Valentine

I'm more the type of... I can get flowers, chocolate and cards on any day of the year. Why does it have to be that Valentine's Day is singled out as the "Spend on your hunny" day? I just never saw the point. To allow me to be bitter for a moment, it goes back to middle school. When we had the option to only pass out Valentine's to those we wanted to, our friends. It wasn't mandatory that it was one for all or none at all.

But, because I didn't want anyone to feel singled out, I wrote down every person in each class I had. And I made them each a Valentine. The little card ones- you know, cheapies from the party shop that everyone loves. But not cheesy- the cute funny off the cuff ones.


Hand Hammered Heart Clasp

Off to school I went, and to classes. First period, Spanish, none for me. But I handed a few out.
Second period, Science, still nothing. But I watched as my classmates giggled and thanked each other for their valentines.

By the time third period, Social Studies, came around, I was ready to cry. Not one person had given me a valentine. I knew I had always been the girl with the funny accent- being from Boston- but I never thought they actually didn't like me. I was quiet, kept to myself, shy most of the time.

Fourth period, Study Hall, I didn't do anything but doodle in my notebook. Contemplated tossing the rest of the Valentine's I had made in the garbage. But that wouldn't be fair to the people I had already passed them to.

Lunchtime, and I didn't eat. I stayed out in the hallway and figured that all I could do was finish the day. I didn't really want to see anyone else, or face my classmates, just wanted to go home. Maybe I could fake being sick... But what's the point. Maybe next class actually wouldn't be that bad. I liked it.

Fifth period I thought I was definitely going to get one. Music Class, I sang in the Chorus. A few of the girls were friendly with me, so surely I'd get one from someone there?

I left to go to my final class of the day for Sixth Period- Math- empty handed. The one class I wasn't crazy about, but at least I understood what we were being taught. Passed out the last few cards I had to give out and sat down at my desk, willing the clock to get to 3pm so I could go home.

Next thing I know, and envelope comes sailing across the desk. A card slipped to me, by my desk friend. Jimmy. Nobody wanted to sit with him, so I did. We quickly became friends... And not only did he slip me a little Valentine card, it had a little heart pin too which I immediately put on my messenger bag. I had already given him the Valentine I held aside especially for him.


45 minutes later the bell rang, and it was time to go home. My best friend caught me in the hallway just before I left to give me the Valentine she had saved for me- we had no classes together this year, and I didn't go to lunch. I gave her the one I had for her, a quick thank you and a hug, and off to the busses and home we went. I felt ignored, broken, insignificant. I thought my classmates liked me... I mean, we weren't exactly all best buddies- they had their cliques set up far before I joined the group at 3rd grade. But I was kind, I was friendly, I'd give the shirt off my back if asked. I'd try to help in any way I could.

When I got home, I went to my room and cried.
I couldn't believe that out of all the people in my class, that only two willingly gave me a Valentine. Only two people. I dried my eyes, unstretched from my floor and happened to notice on my bed was a small box of chocolates and a pink single rose. Opening the card, and through new tears that were starting, I saw it was from my Mother. "Amanda- I hope you know how special you are, and how very much Dad and I love you. Happy Valentine's Day. Love, Mom".


Rose Swarovski Drop


Those three Valentines, I still have them tucked into a memory box.
So goes the story of why I'm not V-Day's biggest fan.

Wednesday, January 27, 2010

My First...

...Time being featured in an Etsy Treasury!


I'm over the moon tonight!
My Jasper Druzy Necklace not only made it to the Treasury, but it's the middle one in the top row! WOW!

I first must apologize, as I've been working hectic hours this past week... Making up time means 12 hour days, and I'm ok with that... Just very much looking forward to the weekend!
The downside is that I'm not online as much as I'd like to be, or poking around and checking out other artists and sites I'd otherwise be engaged with.

Things could be worse, of course, and that they're not I'm very thankful.
I miss my time online... But... Will have plenty this weekend!!

So I get home this evening after having to deal with horrendous traffic that delayed me nearly an hour from getting home (and I live 12 minutes from work)... Tired.... Mentally drained... Worn... Most definitely looking forward to the sleep I would be getting in a short while. But.

First is first.
Off to check Facebook- personal, and my jewelry page of course!
Off to check Etsy.

Nothing sold... BUT..... A Convo!

Intrigued.

Read on:


YAYYYYYYYYY!!!!

I was giggling like a schoolgirl. Well, inside I was! Had I actually done so, I'm pretty positive I'd have freaked out my roommate. Instead, out went profuse thanks.... And promptly Hearting Christie's Etsy Shop, The Goblet where she creates and sells some very beautiful jewelry!

Made my way over to her Facebook Page and fanned her... And last, but certainly not least... Followed her Blog!

I'm so excited about this! I could do backflips... But of course, that's not possible given the condition of my back... But... I'm just that happy!

So go on and take a gander at the Winter's Dawn Treasury!!!

Speaking of winter... And being in Virginia. I thought it mighty funny that there's a Winter Weather Advisory for the possibility of snow tomorrow night. It went out this morning- well over 24 hours until the suspected rain/cold-front/snow is expected to hit.

Now, most of you know that I'm a Northern Girl. It says such when you look at my blog in fact.

I just find it completely amusing that the people down here panic the way they do when "inclement" weather is predicted. They have a hard time driving in rain, nevermind snow!!! Having lived in New England for so long, one becomes accustomed to the weather changes. Winter can be either very cold and icy. Or temperate and lots of snow as a result.

Did you know that if it's too cold, clouds actually lose the ability to hold precipitation and therefore it won't snow? I'm full of odd facts. And yes, we had a few years like that- bitter, biting cold. It was awful. Those were winters I definitely did not leave the house without a scarf wrapped securely around my face!

When we get the moderate winters, it absolutely transforms New England into a Winter Wonderland. The postcards aren't lying- it really is that beautiful at times! Like right after it snows, and that fresh crisp cold smell is still in the air. The wind sounds like a whisper through the trees, and the slightest moving of the branches dislodges snow and creates a domino effect... And more boughs drop snow in a white curtain!

Colonial Style Homes which are white, decorated with lighted candles (electric of course!) in the windows that light just enough outside to create a warm glow. 9 times out of 10 a green wreath with a big red bow on the front door. Oftentimes, white or colored lights outlining the eaves of the roof, or decorating the porch. It's beautiful!

I leave you tonight with a few pictures of what home is to me... Enjoy!


Little Christmas Trees in the backyard, on the hill.


My backyard- the White Mountain National Forest.


The Ageless Oak Tree.

Twilight, with the snow still falling.

Sunday, January 24, 2010

The Jade Calla Lily


It's my favorite flower.

Roses, while very pretty, are so overrated as the "perfect" gifts.

Calla Lilies have always been my favorite. Not for the most common assumption, though.

Yes, I'm totally aware that they're primarily thought of as funeral flowers.
That's right, death flowers. And my argument each time is- if that's the case, what about all the rest of the flowers that may adorn a piece found in a funeral parlor, or at the cemetery for the burial?

The response each time: Silence.

The Calla Lily isn't really a lily. Technically.
The flower sort of emerges from the stem itself- it unfurls into a trumpet-like shape. Delicate and dainty looking- these flowers are quite hardy and are relatively easy to grow and care for. All sorts of colors emerge from the little lovelies- whites, pinks, purples, and two-toned colors as well. Some day, I'll have a garden of Calla Lilies to look at any time I please! In the meantime, I make do with some photographs, and an occasional stem or two from the florist!

Imagine my delight when I came across some hand carved Jade Calla Lilies in one of my favorite bead shops! I couldn't resist, I couldn't say no... I had to have them. There were other carved stones of different kinds- quartz, jasper, and a few others in an assortment of colors- but the Jade ones caught my eye.


Just the slightest hint of green.
Not too large, not too small.
Perfect for projects...
There were only four of them.
And I had to have them.

My problem was... Once I got them home, I had no idea what to make!

So, I took some chain, crystals, and pliers... And let the necklace create itself. After much twisting, cutting, wire wrapping, and maneuvering silver wire and crystals to just the way I wanted... This is what emerged.


A delicate Green Jade Calla Lily Necklace.

I think it would be perfect for a springtime bride as her wedding jewelry. Perhaps for an avid gardner that's usually found in her garden. Or just someone, like myself, that loves the flower just as much as I do. The stone itself radiates light and seems to glow- and the addition of the small bicone crystals adds just a little more sparkle to the piece.


A little extra sparkle is added to the back, where the handmade clasp is decorated with a few more crystals. The necklace itself is 17.5" long, with a 1.5" extender to lengthen it if needed. Just in case you're wondering, the clasp itself is very secure. The loop on the end is just large enough for the chain to be pulled through it, so while situated upon your neck there's really no way for it to come undone. The weight of the stone itself keeps the necklace balanced, and since the decorative crystals are wirewrapped directly to the chain- there's absolutely no way it can come off!


A little more detail.
I do think the other stones have various projects they will emerge in.... One possibility is a sculpted necklace I'll be designing, and perhaps a hair vine with another Calla Lily as the focal point. I will definitely keep you all posted as to how they design themselves into whimsical creations....

Sunday, January 17, 2010

Tips & Tricks- Get Your Silver Sparkling.... QUICKLY!


Honestly...
Who loves to sit and polish silver by hand? Putting the paste on the sponge, rubbing the tarnish on the piece, hoping it comes off... And realizing that after ten minutes of patiently trying to polish the silver- it's NOT coming off.

So... More paste... More "polishing"... More time spent in attempting to get that darn spot off the silver. But- no such luck. It's not budging.

What to do?!

Simple, easy, and it includes everything easily found in your kitchen.
Typically, we use this to get the sterling silverware cleaned for Holiday dinners at our home... BUT... The same technique can be used for sterling jewelry in a pinch.

Ingredients List:

* Baking Soda
* Tin Foil
* Water
* Heatproof Bowl or Pan
* Tea Kettle/Small Saucepan
* Paper Towels
* Mug
* Favorite Type of Tea
* Sugar/Honey

Fill the Tea Kettle or Saucepan with water, and set on the stove to boil. (Microwave can also work if you have a container big enough- boiling takes about 4-7 minutes depending on power)
Tear off a piece of Tin Foil large enough to cover the bottom of your bowl or pan.

Depending on how many items you have, either a bowl or a deep heatproof pan will work. I prefer ceramic- such as Corningware, however Mom likes to do this in our big stainless sink. Scatter your items atop the tin foil, making sure they aren't touching one another.

Sprinkle them with a good amount of Baking Soda. Mind you- they don't have to be completely covered- but a good sprinkling does wonders. Unless your Baking Soda is clumped in the box (like mine does after a while!!) it should come out nice and powdery.

Once the water is boiling, remove from heat and pour over your jewelry/silver in the bowl.


Pour yourself a nice, hot Mug of Tea and add Sugar/Honey to taste.

Immediately upon pouring the water over the items, you should see the silver start to brighten. This is due to an amazing chemical reaction caused by the boiling water coming into contact with the Baking Soda and Tin Foil. While it looks like it's all clean now... Be patient!

Sip your tea, and by the time you're finished- you'll have sparkling sterling silver!

Remove from the bowl/pan, rinse under cool water and lay to dry on paper towels.


Did I also mention that it cleans the stones as well? It doesn't clean quite as well as having a jewelry cleaner and scrubbing the stones with a soft brush- but- as you can see, they have an irresistible luster. Lights, camera, ACTION!


·:*¨¨*:·

Related Posts with Thumbnails